AKS Part 1: Private Networking
The first part of my Azure Kubernetes Service series: deploying a private cluster with Azure CNI networking and exposing an application through Application Gateway.
Azure Kubernetes Service (AKS) is a managed container orchestration platform that enables you to quickly deploy and manage Kubernetes clusters. Welcome to the first part of my Azure Kubernetes Service series. In this post, we'll focus on setting up a private AKS cluster with Azure CNI networking. We'll also create an Azure Application Gateway (AGW) to facilitate access to our private cluster. Additionally, we'll enable the Application Gateway Ingress Controller (AGIC) add-on and dive into configuring AGW using Ingresses, among other things. Let's get started on this exciting journey into deploying and managing AKS!
Prerequisites
- Install the Azure CLI locally.
- If you're using a local installation, sign in to the Azure CLI by using the az login command. To finish the authentication process, follow the steps displayed in your terminal. For other sign-in options, see Sign in with the Azure CLI.
- When you're prompted, install the Azure CLI extension on first use. For more information about extensions, see Use extensions with the Azure CLI.
- Run az version to find the version and dependent libraries that are installed. To upgrade to the latest version, run az upgrade.
💡 Naming Convention: https://learn.microsoft.com/en-us/azure/cloud-adoption-framework/ready/azure-best-practices/resource-naming
💡 Abbreviation examples for Azure resources: https://learn.microsoft.com/en-us/azure/cloud-adoption-framework/ready/azure-best-practices/resource-abbreviations
Create a resource group
In Azure, you allocate related resources to a resource group. Create a resource group by using az group create.
az group create --name myResourceGroup --location westus
Example:
az group create --name rg-helloworld --location westus
Deploy a new AKS cluster with Azure CNI networking
By default AKS using kubenet network configuration. The following example creates a cluster with Azure CNI network configuration. We will enable cluster autoscaler with minimum 1 nodes and maximum 3 nodes. Learn more about networking in Azure Kubernetes Service
az aks create \
    --resource-group myResourceGroup \
    --name myAKSCluster \
    --network-plugin azure \
    --enable-managed-identity \
    --node-count 2 \
    --node-vm-size Standard_B2s \
    --enable-cluster-autoscaler \
	  --min-count 1 \
	  --max-count 3 \
    --generate-ssh-keys
Example:
az aks create -g rg-helloworld -n aks-helloworld --network-plugin azure --enable-managed-identity --node-count 2 --node-vm-size Standard_B2s --enable-cluster-autoscaler --min-count 1 --max-count 3 --generate-ssh-keys
💡 Note: A node resource group will be created with the name
MC_resource-group-name_cluster-name_location.
Deploy application gateway
💡 Caution: When you use an AKS cluster and application gateway in separate virtual networks, the address spaces of the two virtual networks must not overlap. The default address space that an AKS cluster deploys in is 10.224.0.0/12.
Before we create our AGW, we will need to first create a public IP resource, named pip-agw-helloworld, and a new virtual network called vnet-helloworld with address space 10.0.0.0/16, and a subnet with address space 10.0.0.0/24 called subnet-helloworld, and deploy our application gateway in subnet-helloworld using pip-agw-helloworld.
Create a public IP resource for our AGW
az network public-ip create -n myPublicIp -g myResourceGroup --allocation-method Static --sku Standard
Example:
az network public-ip create -n pip-agw-helloworld -g rg-helloworld --allocation-method Static --sku Standard
Create virtual network with a subnet
az network vnet create -n myVnet -g myResourceGroup --address-prefix 10.0.0.0/16 --subnet-name mySubnet --subnet-prefix 10.0.0.0/24
Example:
az network vnet create -n vnet-helloworld -g rg-helloworld --address-prefix 10.0.0.0/16 --subnet-name subnet-helloworld --subnet-prefix 10.0.0.0/24
Create and deploy Application Gateway
az network application-gateway create -n myApplicationGateway -l westus -g myResourceGroup --sku Standard_Small --public-ip-address myPublicIp --vnet-name myVnet --subnet mySubnet --priority 100
Example:
az network application-gateway create -n agw-helloworld -l westus -g rg-helloworld --sku Standard_Small --public-ip-address pip-agw-helloworld --vnet-name vnet-helloworld --subnet subnet-helloworld --priority 100
Enable the Application Gateway Ingress Controller (AGIC) add-on
We need to enable the AGIC add-on in the AKS cluster we created, aks-helloworld, and specify the AGIC add-on to use the existing application gateway we created, agw-helloworld.
$appgwId=$(az network application-gateway show -n myApplicationGateway -g myResourceGroup -o tsv --query "id")
az aks enable-addons -n myCluster -g myResourceGroup -a ingress-appgw --appgw-id $appgwId
Example:
$appgwId=$(az network application-gateway show -n agw-helloworld -g rg-helloworld -o tsv --query "id")
az aks enable-addons -n aks-helloworld -g rg-helloworld -a ingress-appgw --appgw-id $appgwId
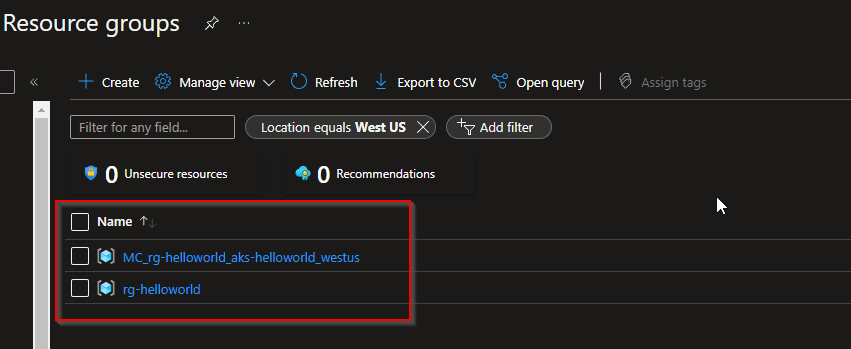
💡 Note: In Azure portal we should see two resource groups. One is the resource group we created
rg-helloworldearlier and the other was created by the AKS cluster.
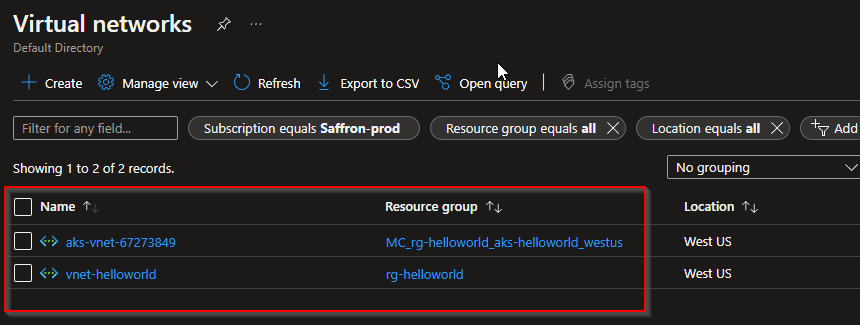
💡 Note: We should also see two visual networks. One we created earlier for AGW in our
rg-helloworldand the other was created by the AKS cluster.
Peer the AKS and AGW virtual networks together
Since we deployed the AKS cluster in its own virtual network and the Application gateway in another virtual network, we will need to peer the two virtual networks together in order for traffic to flow from the Application gateway to the pods in the cluster. Peering the two virtual networks requires running the Azure CLI command two separate times, to ensure that the connection is bi-directional. The first command will create a peering connection from the Application gateway virtual network to the AKS virtual network; the second command will create a peering connection in the other direction.
$nodeResourceGroup=$(az aks show -n myCluster -g myResourceGroup -o tsv --query "nodeResourceGroup")
$aksVnetName=$(az network vnet list -g $nodeResourceGroup -o tsv --query "[0].name")

$aksVnetId=$(az network vnet show -n $aksVnetName -g $nodeResourceGroup -o tsv --query "id")
az network vnet peering create -n AppGWtoAKSVnetPeering -g myResourceGroup --vnet-name myVnet --remote-vnet $aksVnetId --allow-vnet-access

$appGWVnetId=$(az network vnet show -n myVnet -g myResourceGroup -o tsv --query "id")
az network vnet peering create -n AKStoAppGWVnetPeering -g $nodeResourceGroup --vnet-name $aksVnetName --remote-vnet $appGWVnetId --allow-vnet-access
Example:
$nodeResourceGroup=$(az aks show -n aks-helloworld -g rg-helloworld -o tsv --query "nodeResourceGroup")
$aksVnetName=$(az network vnet list -g $nodeResourceGroup -o tsv --query "[0].name")

$aksVnetId=$(az network vnet show -n $aksVnetName -g $nodeResourceGroup -o tsv --query "id")
az network vnet peering create -n agw-aks-peering -g rg-helloworld --vnet-name vnet-helloworld --remote-vnet $aksVnetId --allow-vnet-access

$appGWVnetId=$(az network vnet show -n vnet-helloworld -g rg-helloworld -o tsv --query "id")
az network vnet peering create -n aks-agw-perring -g $nodeResourceGroup --vnet-name $aksVnetName --remote-vnet $appGWVnetId --allow-vnet-access
Connect to AKS cluster
To manage a Kubernetes cluster, use the Kubernetes command-line client, kubectl
Install kubectl locally using the az aks install-cli command:
az aks install-cli
Configure kubectl to connect to your Kubernetes cluster using the az aks get-credentials command.
az aks get-credentials --resource-group myResourceGroup --name myAKSCluster
Example
az aks get-credentials --resource-group rg-helloworld --name aks-helloworld
Verify the connection to your cluster using the kubectl get command. This command returns a list of the cluster nodes.
kubectl get nodes
The following output example shows the one or two nodes (depend on autoscaler) created in the previous steps. Make sure the nodes status is Ready:
NAME                                STATUS   ROLES   AGE   VERSION
aks-nodepool1-15444097-vmss000001   Ready    agent   52m   v1.24.9
Access Private Docker Registry
To pull images from a private docker registry, we need to create a docker registry secret for our AKS cluster.
kubectl create secret docker-registry <myRegistryName> --docker-server=<your-registry-server> --docker-username=<your-name> --docker-password=<your-pword> --docker-email=<your-email>
Example:
kubectl create secret docker-registry tpham-registry --docker-server=registry.tpham.org --docker-username=tpham92 --docker-password='6&=eQDGh)ELB@K' [email protected]
💡 Note: We will need to add the above
tpham-registryin order to pull hello-world image and continue with the tutorial
Deploy applications to AKS Cluster
In this example, we will use a manifest to create all objects needed to run our Hello World application. This manifest includes :
- A hello-world deployment using
[registry.tpham.org/hello-world](http://registry.tpham.org/hello-world)image - A hello-world internal service with type
ClusterIPLearn more about AKS networking - A horizontal pod autoscaling to adjust the number of pods in a deployment depending on CPU utilization or other select metrics.
Create a hello-world-deployment.yaml file using the following:
kind: Service
apiVersion: v1
metadata:
  name: hello-world-svc
spec:
  selector:
    app: hello-world
  type: ClusterIP
  ports:
    - port: 80

---
apiVersion: apps/v1
kind: Deployment
metadata:
  name: hello-world
spec:
  replicas: 3
  selector:
    matchLabels:
      app: hello-world
  template:
    metadata:
      labels:
        app: hello-world
    spec:
      containers:
        - name: hello-world
          image: registry.tpham.org/hello-world
          readinessProbe:
            httpGet:
              path: /health
              port: 80
          resources:
            limits:
              cpu: "300m"
          ports:
            - containerPort: 80
      imagePullSecrets:
        - name: tpham-registry

---
apiVersion: autoscaling/v1
kind: HorizontalPodAutoscaler
metadata:
  name: hpa-hello-world
spec:
  scaleTargetRef:
    apiVersion: apps/v1
    kind: Deployment
    name: hello-world
  minReplicas: 1
  maxReplicas: 10
  targetCPUUtilizationPercentage: 50
Deploy the application using the kubectl apply command and specify the name of our YAML file above:
kubectl apply -f hello-world-deployment.yaml
Verify the created pods and services
kubectl get pods,svc

NAME                               READY   STATUS    RESTARTS   AGE
pod/hello-world-6d887ddf5d-2tpff   1/1     Running   0          67s
pod/hello-world-6d887ddf5d-644mn   1/1     Running   0          67s
pod/hello-world-6d887ddf5d-n55b5   1/1     Running   0          67s

NAME                      TYPE        CLUSTER-IP     EXTERNAL-IP   PORT(S)   AGE
service/hello-world-svc   ClusterIP   10.0.180.151   <none>        80/TCP    67s
service/kubernetes        ClusterIP   10.0.0.1       <none>        443/TCP   3h11m
Configuring AGW via Ingresses
We'll create a simple AGIC ingress that will automatically config our application gateway so that we can access our private AKS cluster.
Create a ingress.yaml file with the following:
apiVersion: networking.k8s.io/v1
kind: Ingress
metadata:
  name: hello-world-ingress
  annotations:
    kubernetes.io/ingress.class: azure/application-gateway
spec:
  defaultBackend:
    service:
      name: hello-world-svc
      port:
        number: 80
  rules:
    - http:
        paths:
          - path: /
            pathType: Prefix
            backend:
              service:
                name: hello-world-svc
                port:
                  number: 80
Deploy our AGIC ingress:
kubectl apply -f ingress.yaml
Test the application
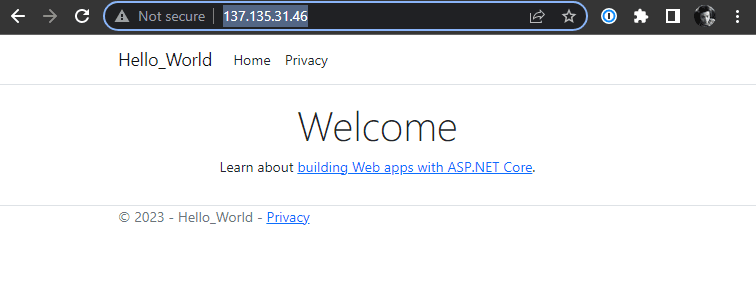
Now that the application gateway is set up to serve traffic to the AKS cluster, let's verify that our application is reachable. We'll first get the IP address of the Ingress. It may take application gateway a minute to get the update.
kubectl get ingress

NAME                  CLASS    HOSTS   ADDRESS         PORTS   AGE
hello-world-ingress   <none>   *       137.135.31.46   80      24m
💡 Note: This IP address is the front-end public IP address we created earlier (
pip-agw-helloworld) for our AGW
We should be able to visit our application from the IP address or check with curl
💡 In the next installment we will ingrate Azure key vault to our application and update our title page with a secret we store in AKV.